
Documentation
Authentication for Push/Pull Operations
Critiq will use connected provider tokens (GitHub/GitLab) for HTTPS remotes when available; otherwise it falls back to your system git configuration (SSH or your credential helper). Configure one of the flows below to keep push/pull/fetch seamless.
In-App OAuth (GitHub/GitLab)
Critiq supports OAuth sign-in for GitHub, GitLab BitBucket and Azure DevOps so you can connect accounts without manually managing tokens. Use this for PR review, branch browsing, and cloud-aware workflows—plus HTTPS push/pull/fetch when a linked account matches the remote.
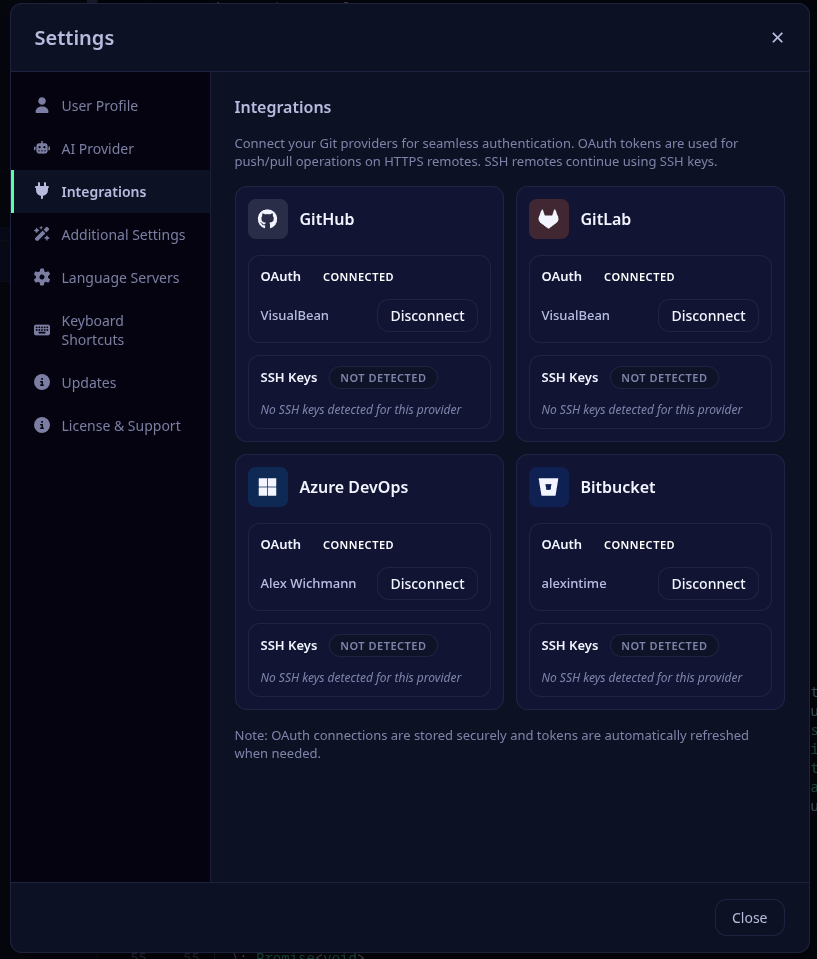
- Open Critiq and go to Settings → Accounts.
- Click “Sign in with {provider} and complete the OAuth flow.
- For HTTPS remotes, Critiq will use your connected account token for push/pull/fetch; SSH remotes still use your keys.
Self-Hosted Git Providers (Gitea/Forgejo/GitLab)
Critiq supports self-hosted Git providers like Gitea, Forgejo, and GitLab Self-Hosted with full OAuth authentication. You can configure multiple instances with custom names and credentials.
Gitea / Forgejo Setup
-
Create OAuth Application in Gitea/Forgejo:
-
Navigate to your Gitea/Forgejo instance (e.g.,
https://git.company.com) - Go to Settings → Applications → OAuth2 Applications
- Click Create a new OAuth2 Application
-
Fill in:
- Application Name: Critiq
- Redirect URI:
http://localhost:8765/callback -
Permissions: Select
repoanduser:email
- Save and copy the Client ID and Client Secret
-
Navigate to your Gitea/Forgejo instance (e.g.,
-
Add to Critiq:
- Open Critiq and go to Settings → Integrations → Self-Hosted Providers
- Click Add Self-Hosted
-
Fill in:
- Name: A friendly name (e.g., "Work Gitea")
- Platform: Gitea / Forgejo
-
Base URL: Your instance URL (e.g.,
https://git.company.com) - OAuth Client ID: Paste from step 1
- OAuth Client Secret: Paste from step 1
-
OAuth Scopes:
repo, user:email(or leave empty for defaults)
- Click Add Provider
- Click Connect with OAuth to authenticate
GitLab Self-Hosted Setup
-
Create OAuth Application in GitLab:
- Navigate to your GitLab instance
- Go to User Settings → Applications
-
Fill in:
- Name: Critiq
- Redirect URI:
http://localhost:8765/callback -
Scopes:
api,read_repository,write_repository
- Save and copy Application ID and Secret
-
Add to Critiq:
- Open Critiq and go to Settings → Integrations → Self-Hosted Providers
- Click Add Self-Hosted
-
Fill in:
- Name: A friendly name (e.g., "Company GitLab")
- Platform: GitLab Self-Hosted
-
Base URL: Your instance URL (e.g.,
https://gitlab.company.com) - OAuth Client ID: Paste Application ID from step 1
- OAuth Client Secret: Paste Secret from step 1
-
OAuth Scopes:
api, read_repository, write_repository(or leave empty for defaults)
- Click Add Provider
- Click Connect with OAuth to authenticate
Note: Self-hosted providers work exactly like built-in providers—OAuth tokens are used for HTTPS push/pull/fetch, code review features are fully supported, and repositories are automatically matched by remote URL hostname.
Recommended: SSH Keys (Most Common)
SSH keys are the most reliable and secure method for git authentication.
Setting up SSH Keys
-
Generate an SSH key (if you don't have one):
Press Enter to accept the default file location and optionally set a passphrase.ssh-keygen -t ed25519 -C "your_email@example.com" -
Add your SSH key to the ssh-agent:
eval "$(ssh-agent -s)" ssh-add ~/.ssh/id_ed25519 -
Add the public key to your git provider:
-
GitHub: Copy your public key:
cat ~/.ssh/id_ed25519.pub→ Go to GitHub Settings → SSH and GPG keys → New SSH key → Paste your public key and save -
GitLab: Copy your public key:
cat ~/.ssh/id_ed25519.pub→ Go to GitLab Preferences → SSH Keys → Paste your public key and save -
Azure DevOps: Copy your public key:
cat ~/.ssh/id_ed25519.pub→ Go to User Settings → SSH public keys → Add → Paste your public key and save
-
GitHub: Copy your public key:
-
Update your git remote to use SSH (if currently using HTTPS):
cd /path/to/your/repo
git remote set-url origin git@github.com:username/repository.git
Alternative: GitHub CLI
If you primarily use GitHub, the GitHub CLI provides an easy authentication setup:
- Install GitHub CLI: https://cli.github.com/
-
Authenticate:
Follow the prompts and select "HTTPS" when asked about git protocol.gh auth login
This configures git credential helper automatically.
Alternative: Git Credential Manager
For HTTPS authentication with credential storage:
- Install Git Credential Manager (comes with Git for Windows, separate install on macOS/Linux)
-
Configure git to use it:
git config --global credential.helper manager-core - First push/pull will prompt for credentials and store them securely
Troubleshooting
"Permission denied (publickey)" error
- Your SSH key is not added to your git provider
- Follow the SSH setup steps above
"Authentication failed" error
- If using HTTPS, configure Git Credential Manager or GitHub CLI
- Or switch to SSH authentication (recommended)
Previous OAuth-based git clients
If you previously used a git client with its own OAuth authentication system, that authentication won't work with standard git tools. You'll need to set up SSH keys or use one of the alternative methods above.
Commit Signing
Git supports cryptographically signing commits to verify authorship. You can use either GPG keys or SSH keys for signing.
Option 1: Sign commits with SSH keys (Git 2.34+)
Use your existing SSH key for both authentication and signing:
-
Configure git to use SSH for signing:
git config --global gpg.format ssh git config --global user.signingkey ~/.ssh/id_ed25519.pub -
Enable automatic commit signing:
git config --global commit.gpgsign true -
Add your signing key to your git provider:
- Settings → SSH and GPG keys → New SSH key → Select "Signing Key" as key type
Option 2: Sign commits with GPG keys
Traditional GPG signing (supported by all providers):
-
Generate a GPG key:
Choose RSA and RSA, 4096 bits, and enter your name and email.gpg --full-generate-key -
List your GPG keys and copy the key ID:
Copy the key ID (the part aftergpg --list-secret-keys --keyid-format=longrsa4096/) -
Configure git to use your GPG key:
git config --global user.signingkey YOUR_KEY_ID git config --global commit.gpgsign true -
Export and add your public key to your git provider:
Copy the output and add it to the provider:gpg --armor --export YOUR_KEY_ID- GitHub: Settings → SSH and GPG keys → New GPG key
- GitLab: Preferences → GPG Keys
- Azure DevOps: User Settings → GPG Keys
Verification
Once configured, all commits made through Critiq (and git CLI) will be automatically signed. Your git provider will show a "Verified" badge on signed commits.
Additional Features
Branch Context Menu
Right-click any local branch in the branch dropdown to:
- Push - Push commits to remote (shows if branch is ahead)
- Pull - Pull commits from remote with fast-forward only (shows if branch is behind)
- Fetch - Fetch latest changes from remote without merging
File Context Menu
Right-click any file in the changes pane to:
- Stage/Unstage - Move files between staged and unstaged
- Line-level Stage/Unstage - Hover changed lines in diff view and use round +/- gutter buttons for single-line granularity
- Add to Scratchpad - Park file changes to restore later (Experimental)
- Discard Changes - Discard staged or unstaged changes (context-aware)
- Delete File - Delete untracked or newly added files
File Tree Text Search
Open File Tree Text Search with your configured shortcut to search across the repository without leaving the sidebar. You can scope results to changed files only and use hunk markers to see whether each result line is inside a changed hunk.
- Green dot - The matched line is inside a changed hunk.
- Red dot - The matched line was removed (only shown when "Include removed lines" is enabled).
- Gray dot - The file is changed, but that matched line is outside changed hunks.
- No dot - The result is from a file outside the current changeset, so hunk status does not apply.
Keyboard Shortcuts
- Ctrl/Cmd + P - Toggle quick file search
- Ctrl/Cmd + Shift + F - Open text search
- Ctrl/Cmd + H - Previous file (navigate file history in working changes)
- Ctrl/Cmd + L - Next file (navigate file history in working changes)
- Ctrl/Cmd + J - Next hunk
- Ctrl/Cmd + K - Previous hunk
- Ctrl/Cmd + Shift + J - Next file in changes list
- Ctrl/Cmd + Shift + K - Previous file in changes list
- Ctrl/Cmd + S - Stage/unstage current hunk (or save file in edit mode)
- Alt + S - Stage/unstage current line
- Ctrl/Cmd + Shift + S - Stage/unstage entire file
- Ctrl/Cmd + E - Toggle edit mode
- Ctrl/Cmd + Shift + R - Toggle file reviewed status (PR mode)
Note: All keyboard shortcuts can be customized in Settings.
Command Palette Modes
Open the command palette with Ctrl/Cmd + P. You can search normally, or use a mode prefix to narrow behavior.
- Default (no prefix): Search changed files, all files, and symbols.
-
:Line jump mode. Type a line number and press Enter to jump in the currently open file. -
c:Class/type symbol filter. -
m:Method/function symbol filter. -
v:Variable/property/field symbol filter. -
>Command mode for Git actions (stage, unstage, discard, commit, push, pull, fetch, stash). In branch comparison mode, this command mode is unavailable.
Enter these modes by typing the prefix directly in the palette input.
Additional Settings
Scratchpad
In Settings → Additional Settings → Experimental, enable Enable Scratchpad to show Scratchpad actions and the Scratchpad section in the Changes panel.
Scratchpad lets you park file or hunk changes, then restore them later without losing context. When disabled, all Scratchpad buttons, menu actions, and list entries are hidden.
In Scratchpad diff view, you can also restore individual changed lines back into your unstaged working tree with the same green + gutter control.
How this differs from git stash:
- Granular by design - Scratchpad supports parking and restoring at file or hunk level.
- Always visible in UI - Parked entries stay in the Changes panel instead of a stack hidden behind CLI commands.
- Selective workflow - Move only the noise out of your current commit, without stashing everything.
Auto-triage files
In Settings → Additional → Code Review, enable Auto-triage files to automatically analyze all files when loading a comparison or PR. Results appear in the triage panel as they complete. This requires an AI provider to be configured.
Auto-triage is disabled by default. You can still run triage manually by right-clicking a file and choosing Triage File — the setting only controls the automatic run.
Hunk-level change tracking in PRs
In Settings → Additional → Code Review, enable Hunk-level change tracking in PRs to show which individual hunks have been reviewed, modified, or are new. This is more precise than file-level tracking. Status appears as a small badge in the hunk header.
Graph Lane Cap
In Settings → Additional → Git Operations, use History graph lane cap to control how many graph lanes are rendered at once in the commit graph. A lower value keeps the graph compact and faster in very large repositories, while a higher value shows more parallel branches.
When the graph exceeds the cap, the last lane is reserved as an overflow lane so you still see the full shape of the history.
Language Server Protocol (LSP) Support
Critiq provides intelligent code features like hover information, go-to-definition, and symbol search through Language Server Protocol (LSP) integration. LSP servers are automatically detected and started based on the languages in your repository.
Supported Languages (Default Configuration)
Out of the box, Critiq supports the following languages:
- Go - gopls
- Rust - rust-analyzer
- C# - OmniSharp
- Vue - vue-language-server (Volar)
- TypeScript/JavaScript - typescript-language-server (provides full project context)
- Python - pylsp (disabled by default, enable in config if installed)
Installing Language Servers
Language servers must be installed separately on your system. Critiq will automatically find them if they're in your PATH or in common installation locations.
Go (gopls)
go install golang.org/x/tools/gopls@latestRust (rust-analyzer)
rustup component add rust-analyzerC# (OmniSharp)
Download from: https://github.com/OmniSharp/omnisharp-roslyn/releases
Vue (Volar)
npm install -g @vue/language-serverTypeScript/JavaScript
npm install -g typescript-language-server typescriptPython (pylsp)
pip install python-lsp-serverCustomizing LSP Configuration
You can customize language server behavior by creating a configuration file at:
- Linux/macOS:
~/.config/critiq/lsp-servers.json - Windows:
%APPDATA%\critiq\lsp-servers.json
Configuration Examples
Enable Python LSP:
{
  "python": {
    "enabled": true
  }
}
Disable a language server:
{
  "csharp": {
    "enabled": false
  }
}
Custom installation path:
{
  "go": {
    "command": "gopls",
    "searchPaths": [
      "/custom/path/to/gopls",
      "/home/user/go/bin/gopls"
    ]
  }
}
Add custom arguments and initialization options:
{
  "go": {
    "command": "gopls",
    "args": ["-logfile", "/tmp/gopls.log"],
    "initializationOptions": {
      "usePlaceholders": true,
      "completionDocumentation": true
    }
  }
}
Add a new language server:
{
  "ruby": {
    "enabled": true,
    "command": "solargraph",
    "args": ["stdio"],
    "fileExtensions": ["rb"]
  }
}
Configuration Options
Each language server can be configured with the following options:
-
enabled(boolean) - Whether to enable this language server. Default:true -
command(string) - The executable command name or path -
args(array) - Command line arguments to pass to the language server -
fileExtensions(array) - File extensions this server should handle (e.g.,["go"]) -
searchPaths(array) - Custom paths to search for the executable if not in PATH -
initializationOptions(object) - LSP-specific initialization options passed to the server
Your custom configuration will be merged with Critiq's defaults, so you only need to specify the options you want to change.
Troubleshooting LSP
Language server not starting:
-
Check that the language server is installed:
which gopls(or relevant command) - Check the console logs in Critiq for error messages
- Verify the language server works from command line
-
Add a custom
searchPathsin your config if installed in a non-standard location
No code intelligence features:
- Ensure files are saved (LSP servers work on saved file content)
- Wait a few seconds for the language server to initialize on first use
- Check that the file extension matches the configured
fileExtensions
Language server performance issues:
- Large repositories may take time to index
- Check language server documentation for performance tuning options
- Add tuning options via
initializationOptionsin your config
Monorepo Workspaces
Critiq supports monorepos by letting you open a focused workspace within a larger repository. Workspaces keep the file explorer scoped to a subfolder while still letting you review changes across the entire repo.
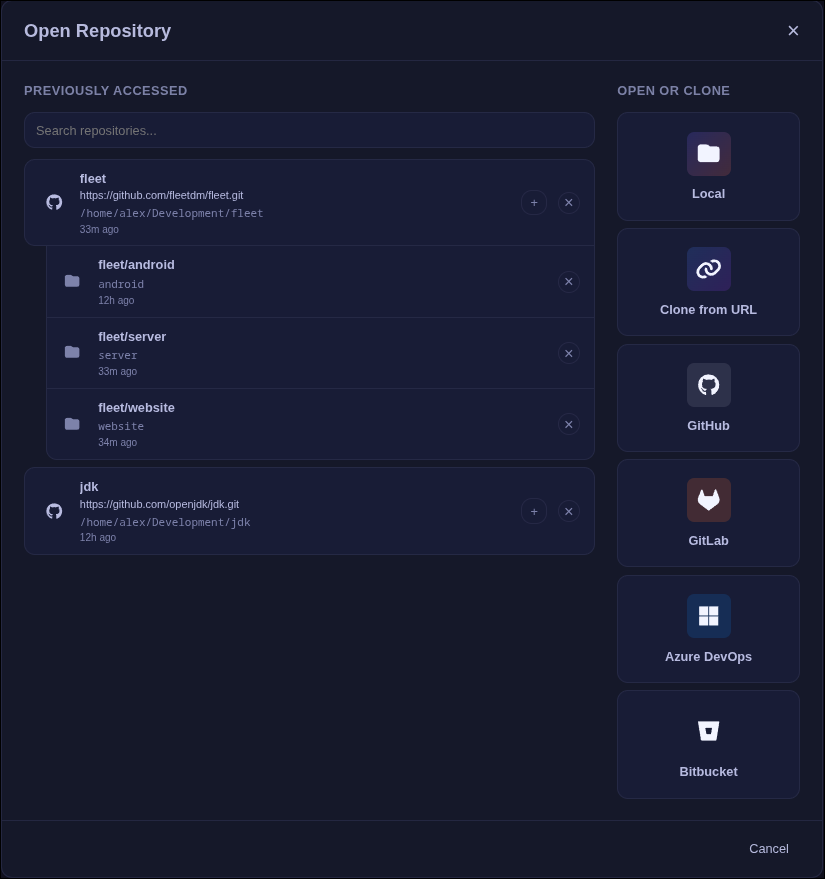
Adding a Workspace
- Open the repository selection window and add the repository root.
- In the repository picker, click the "+" button next to the repo to add a workspace.
- Select the workspace folder (for example:
packages/frontend). - Optionally set a display name for the workspace.
Workspace Behavior
- The file explorer shows only the workspace subfolder.
- Branch comparisons and PR reviews list all changed files, grouped by workspace vs outside the workspace.
- The Changes list and commit file lists keep the same workspace/outside grouping.
- Language servers and symbol indexing run from the workspace root for accurate monorepo intelligence.
- Conflict resolution covers the entire repository.
Submodule Support
Submodule updates are shown with an orange S status instead of a line-by-line diff. Critiq shows a list of commits between the old and new submodule SHAs.
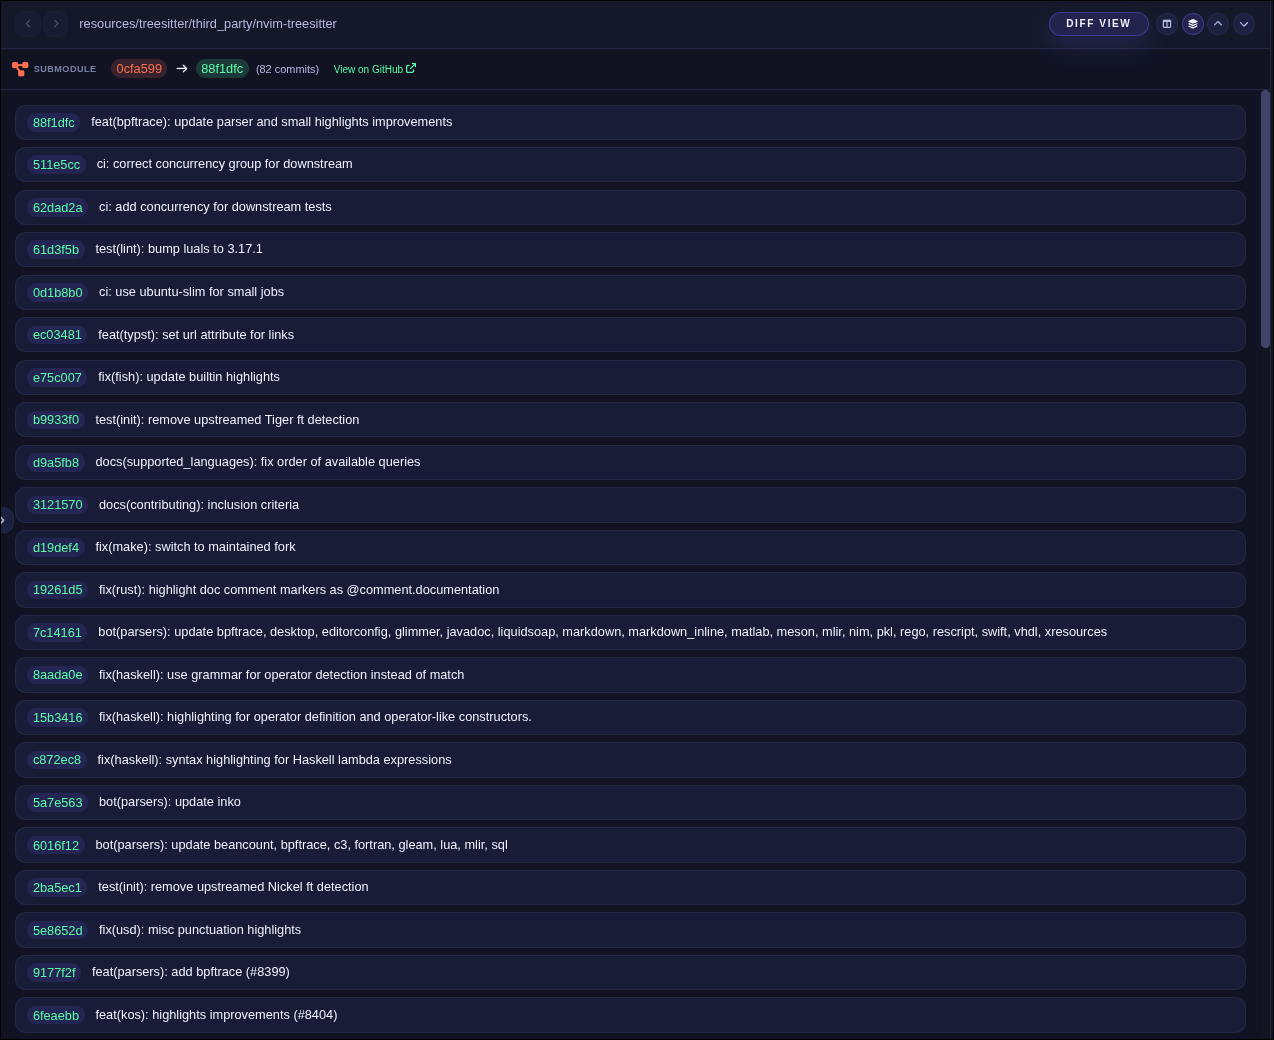
- Right-click a submodule entry in the Changes list or commit files and choose View Submodule Diff.
- This opens the submodule SHA diff inside Critiq, so you can review the submodule changes directly.